Showing posts with label tutorial. Show all posts

Tutorial Install CMS Lokomedia Shops in Localhost

Continue sharing me some time ago about making an online shop with easy to use CMS Stores Lokomedia, well now I'll share how to install lokomedia on localhost first. Cekidot,,

To install lokomedia on localhost, you must install xampp or similar application on your computer. Here I use xampp. (Download below!)

Stage Stores Lokomedia CMS database creation:

    1. Install xampp, then run xampp. Click start.
    xampp running
  1. If it is running and the first new install xampp, try on your browser type "localhost", then select English and it will appear like this.
  2. xampp windows
# Already in his Lokomedia CMS files have not you?? if not please be downloaded below, and when he immediately wrote in the extract.
# Now you try to go into PHPMyAdmin => "http://localhost/phpmyadmin/".
    phpmyadmin
  1. Create a database to accommodate data from cms lokomedia, click the "DATABASE" On the top menu, then input the name of the database "dbtoko", click CREATE.
  2. create database
  3. On the left menu will display the name of the database that we just created, now click the database name is "dbtoko".
  4. database list
# Click the "Import" above, because we will import a database.
# Click browse to locate the file "dbtoko.sql". Note: dbtoko.sql already available in the download package tokolokomedia cms.
# If you have found the file, click "GO".
    browse database
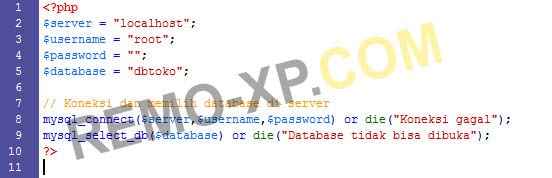
    koneksi php
  3. Setting in the image can be adjusted by the name of the database you use, the picture above only the default settings alone. If you will be put online, I recommend setting it changed (password & database name), for security.
  4. Next, you can try accessing the "http://localhost/tokohp"
  5.  If successful, it would look like this. (if using the default themes cms lokomedia store, the display will be different if you use themes griya).
    toko lokomedia
  6.  To go to the admin page, you can access the "http://localhost/tokohp/adminweb/". Info: A good idea to rename the folder adminweb for security.
  7. The default administrator login "username: admin & password:" admin ".
    adminweb
8. Done, good luck ..!

UPDATE: Those who can not, try the switch mod_rewrite.

    1. Open the file httpd.conf in xampp folder "/ apache / conf".
    2. Search for "mod_rewrite", then remove the "#" sign.
    3. Example: # LoadModule rewrite_module modules / mod_rewrite.so.
    4. Done, do not forget the save and restart apache it (xampp).

 
Password : www.remo-xp.com
Download XAMPP Windows Free
Download CMS Toko Lokomedia ||
Flash Professional 8 Tutorial : The Pencil Tool

Flash Professional 8 Tutorial : The Pencil Tool

The Pencil Tool

You use the Pencil tool to draw freehand shapes. You need to draw a tree trunk and a treetop to create a tree.
Create the Tree Trunk
  1. Choose View > Grid > Edit Grid from the menu.
  2. Deselect Snap to Grid.
  3. Click OK.
  4. Choose the Pencil tool.
Pencil tool
  1. Click the Stroke color box and choose brown as the stroke color.
  2. Click the Fill color box and choose brown as the fill color.
  3. On the Modifier panel, if Object Drawing is selected, deselect Object Drawing.
  4. On the Modifier panel, choose the Smooth option. This option rounds the corners of your drawing.
Smooth option
  1. Draw the tree trunk. Make sure the starting point and the ending point connect.
Draw tree
  1. Choose the Paint Bucket tool. You use the Paint Bucket tool to fill enclosed areas with color.
Paint Bucket tool
  1. Click inside the trunk to fill the trunk with color.
Fill tree
Note: If your tree trunk does not fill with color, you might have gaps. To close the gaps, click on the Gap Size modifier and choose Close Large Gaps.
Close Gaps
Create the Tree Top
  1. Choose the Pencil tool.
  2. Click the Stroke color box and choose green as the stroke color.
  3. Click the Fill color box and choose green as the fill color.
  4. Draw a treetop like the one shown here.
Treetop
  1. Choose the Paint Bucket tool.
  2. Click inside the treetop to fill the treetop with color.
Fill treetop
Create the Tree
Create a tree
  1. Choose the Selection tool.
  2. Double-click the treetop to choose the treetop.
  3. Drag the treetop over the tree trunk.

Grouping

Flash Professional 8 views the tree as two objects, the treetop and the tree trunk. In the next exercise you will group the treetop and the tree trunk to cause Flash Professional 8 to view the tree as a single object. Then you will turn the tree into a symbol.
  1. Choose the Selection tool.
  2. Use the Selection tool to create a rectangle around the tree. This selects the tree.
  3. Choose Modify > Group from the menu to make the treetop and the tree trunk a single object.
  4. Choose Modify > Convert to Symbol from the menu. The Symbol Properties box will open.
  5. Type Tree in the Name field.
  6. Choose Graphic as the Behavior type.
  7. Click OK. The tree now appears in the Library.
  8. Press the Delete key to remove the tree from the Stage.
Flash Professional 8 Tutorial : Layers

Flash Professional 8 Tutorial : Layers

Creating Your Movie
You have created all your graphics and have stored them as symbols. You are now ready to create your movie. Start by drawing buildings.
Draw the Buildings
Draw buildings
  1. Choose the Line tool.
  2. Move to the Stage and draw buildings as shown in the illustration.
Add Color to the Buildings
Fill buildings
Fill the first building with color:
  1. Choose the Paint Bucket tool.
  2. Click on the Fill color box and choose tan as the fill color.
  3. Click in the first building to fill the building with color.
Fill the next building with color:
  1. Click the Fill color box and choose green as the fill color.
  2. Click in the second building to fill the building with color.
Fill the last building with color:
  1. Click the Fill color box and choose pink as the fill color.
  2. Click in the last building to fill the building with color.

Layers

Think of a layer as a transparent sheet on which you paint. You can see through each layer to the layers under it until you add color. You can add layers, delete layers, and change the position of layers. Each layer is independent of all other layers. The layer you are currently working on is called the active layer. You can view layer information on the Timeline.

Renaming a Layer

Change the name of the current layer:
  1. Click the layer you want to rename.
Rename layer
  1. Choose Modify > Timeline > Layer Properties from the menu. The Layer Properties dialog box opens.
  2. Type Buildings in the name field.
  3. Click OK.
Flash Professional 8 Tutorial : The Oval Tool

Flash Professional 8 Tutorial : The Oval Tool

In the exercises that follow, you will be creating graphics. When creating graphics, the grid is often helpful. To turn on the grid:
  1. Choose View > Grid > Edit Grid from the menu. The Grid dialog box opens.
Grid
  1. Click the Color box and select gray to have the grid lines display in gray.
  2. Choose Show Grid to cause the grid to display.
  3. Choose Snap to Grid to cause the edges of your graphic to align with the grid lines.
  4. Set the Horizontal field Horizontal field to 20 px to separate horizontal lines by 20 pixels.
  5. Set the Vertical field Vertical field to 20 px to separate vertical lines by 20 pixels.
  6. Set the Snap Accuracy to Normal.
  7. Click OK.

The Property Inspector

In the Property inspector, you can set the attributes of objects as you work. You will use the Property inspector frequently when working in Flash Professional 8. To open the Property inspector:
  • Choose Window > Properties> Properties from the menu. The Property inspector appears at the bottom of the screen.
Property inspector
The Property inspector is one of many panels found in Flash. When you are not working in a panel, you can collapse the panel. To collapse the Property inspector, click the Collapse icon. To open the Property inspector again, click the Expand icon.

The Oval Tool

In the exercise that follows, you will use the Oval tool to draw an ellipse. You will then turn the ellipse into a symbol. Symbols are reusable graphics you store in the Library. Later in the tutorial you will turn the ellipse into the button movie viewers press to start the movie.
To draw the ellipse:
  1. Choose the Oval tool. There are two color boxes on the Modifier panel. These color boxes are used to set the stroke and fill colors. The stroke color outlines your drawing. The fill color fills the center of your drawing.
Toolbar
  1. Click the Stroke Color box and then click the color black to choose black as your stroke color.
  2. Click the Fill Color box and then click the color navy to choose navy as your fill color.
  3. If selected, click to deselect the Object Drawing option. The Object Drawing option enables you to draw your ellipse as a grouped object that will not merge with other objects you draw. You want this option turned off.
You set the thickness of the Stroke line in the Property inspector. To set the thickness of the Stroke line:
  1. If the Property inspector is not open, choose Window > Properties> Properties from the menu. The Property inspector appears at the bottom of the screen.
Property inspector
  1. Choose Solid from the drop-down menu to select the type of line that will outline your drawing.
  2. Type 3 in the Stroke Height field to set the line thickness.
  3. Click on the Stage and drag diagonally to draw the ellipse.
Ellipse
Note: You can also use the Property inspector to set the stroke and fill colors.
Flash 8 Tutorial : View Movie

Flash 8 Tutorial : View Movie

In this tutorial I take you step-by-step through the process of creating this Flash Professional 8 movie. You will learn how to create graphics, work with layers, and add motion, sound, and text to your movie.

Getting Started

To begin, open Flash Professional 8. You will be presented with the screen shown here.
Flash entry screen
Click Flash Document. The screen shown here appears:
Flash screen
The upper left corner of the screen displays the Tools palette, which contains tools you can use to create or modify graphics and text. You select a tool by clicking on it. Tool modifiers for the selected tool display below the Tools palette. You use modifiers to set tool options.
The Timeline appears in the upper portion of the screen. You use the Timeline to lay out the sequence of your movie.
The Stage displays in the center of the screen. You create your movie on the Stage.

Movie Properties

You start creating your movie by setting the Frame Rate, Dimensions, Background Color, and Ruler Units.
Frame Rate The speed of the movie
Dimension The size of the Stage
Background Color The color of the Stage
Ruler Units The unit of measure the ruler displays
You set these properties in the Movie Properties dialog box. To set the properties for the movie you are going to create:
  1. Choose Modify > Document from the menu. The Document Properties dialog box opens.
Document Properties
  1. Type 400 px in the Width field.
  2. Type 400 px in the Height field.
  3. Click the Background color box and choose white as the background color.
  4. Type 12 in the Frame Rate field.
  5. Choose Pixels from the drop-down menu in the Ruler Units field.
  6. Click OK.
Web Design Tutorials : Frames in Rows and Columns

Web Design Tutorials : Frames in Rows and Columns

You can mix Rows and Columns in the same Frameset document. It's not done much in web design, these days. But it's useful to know how to do it.
If you want a frame split like this one below:
Frames in Rows and Columns
Then the way to do it is to nest one set of FRAMESET tags inside another. The frame in the diagram has two Rows. The second Rows is split into two columns. So the code would be this:
<FRAMESET ROWS = "20%, 80%">
<FRAME NAME = frameOne SRC = RowOne.html>
<FRAMESET COLS = "25%, 75%">
<FRAME NAME = frameTwo SRC = ColOne.html>
<FRAME NAME = frameThree SRC = ColTwo.html>
</FRAMESET>
</FRAMESET>
It looks a little complicated, but note that there are now two sets of FRAMESET tags, each with there own start and end tag.
The first FRAMESET Tag sets out the rows
<FRAMESET ROWS = "20%, 80%">
Into the 20% Row has gone the first FRAME tag, as normal. But the 80% row is now not a FRAME tag but another FRAMESET tag. So you are filling that 80% with two FRAME columns. The two FRAME columns will have a size of 25% and 75%
<FRAMESET COLS = "25%, 75%">
The FRAME tags for this new FRAMESET code are as normal:
<FRAME NAME = frameTwo SRC = ColOne.html>
<FRAME NAME = frameThree SRC = ColTwo.html>

The first of those FRAME tags will go into the 25% column of the second Row, and the other one will go into the 75% column.
Finally, the two FRAMESET tags have their end tags </FRAMESET>


Inline Frames

You can add something called an inline frame, or IFRAME, to a web page. (However, the Netscape browser doesn't recognize the IFRAME tag, so you'd have to be certain that all your users will have Internet Explorer if you're going to insert an IFRAME onto your page.)
An IFRAME looks like this:
An example of an IFRAME
The code for an Inline Frame goes into a normal HTML document, between the two BODY tags. This code is this:
<IFRAME SRC =page2.html Width = 70% height = 40%>
</IFRAME>
The first IFRAME tag needs a Source (SRC) attribute and a width and height. Don't forget the end IFRAME tag </IFRAME>.
Inline Frames can present security problems, which is why Netscape is so touchy about them. They can be quite handy, though.


Other Frame Attributes

There are a number of useful attributes that you can add to FRAMESET and FRAME code. You've already met the BORDER attribute, which when set to zero will hide those awful grey bars. Here are some attributes that you should be familiar with.

Frame Margin

By default, the contents of each frame will have a border around the contents of 8 pixels. You can change this margin with the MARGINWIDTH and MARGINHEIGHT. The attribute goes inside the FRAME tag whose margins you want to change. Like this:
<FRAME NAME =f1 SRC = p1.html MARGINWIDTH = 10 MARGINHEIGHT = 20>
Or you can remove the margin altogether by setting both to zero. (Not the word zero, the number 0)

NORESIZE

If you have the grey borders showing in your frames, the size of each of your frames can be changed by the user. If the cursor is placed over the grey bar, the user can click with the left mouse button and drag the border to a new position. To prevent them doing this, use the NORESIZE attribute. It doesn't need a value. The attribute goes inside the FRAME tag whose border you don't want to be changed:
<FRAME NAME =f1 SRC = p1.html NORESIZE>
You can decide whether a frame should have a scroll bar or not. The attribute to use is SCROLLING followed by either Yes or No. The default for browsers is to show scroll bars only when needed. Then, they will appear only if the page contents are longer than the screen. You should only use this tag if you're certain that no scroll bars should appear at all on your pages. Again, the attribute goes in the FRAME tag whose scrolling you want to switch off:
<FRAME NAME =f1 SRC = p1.html SCROLLING = No>

No Frames

Some earlier browsers are just not capable of displaying frames at all. In which case, the NOFRAMES tag comes in handy. It's a rare visitor these days, though, who doesn't have a browser that can't support frames. Still, it's considered polite to include the tag, anyway. You use it like this:
…FRAMESET code here
</FRAMESET>
<NOFRAMES>
<BODY>
This page uses frames, but your browser doesn't seem to support them. Our alternative page can be found here AltPage

</BODY>
</NOFRAMES>
</HTML>

Notice the use of the two BODY tags inside the NOFRAMES tags. The text you want to display if the user doesn't have a browser that supports frames is then typed between the two BODY tags. This can be anything you want.

And that wraps up our section on frames. You may, or may not, be happy to learn that this is also the end of the HTML course. Now that you have a good grasp of HTML, you can move on to Cascading Style Sheets, and JavaScript.
Web Design Tutorials : Colour, Headings, Centre

Web Design Tutorials : Colour, Headings, Centre

Getting text into your web page is quite easy - just start typing between the two BODY tags. When you save your work and view it in a browser, the text will appear without any special formatting. You don't need to specify a type of font to use, or a colour, or a size. This is because browsers are set up to use defaults when no instructions are given.
Text formatting, in html terms, is when you give the browser instructions on how your text should look. These instructions come in the form of tags, and you'll learn these now.

Colour

You can specify which colour you want to use for all the text on your web page. The browser default is black, so you only really need to specify a colour if you don't want black. Here's how to do it.
  • Start your HTML Editor
  • Click File > New
  • Set a background colour and click OK
  • When you see the code, locate the first BODY tag
  • Click your cursor after the "Y" of BODY
  • Press the spacebar on your keyboard
  • Type in TEXT =
  • Then type a colour for your text
  • In between the two BODY tags, start typing you text
  • Save your web page, and then view the results
  • In the code below, the text has been set to Blue
<HTML>
<HEAD>
<TITLE></TITLE>
</HEAD>
<BODY TEXT = Blue>
</BODY>
</HTML>


If all you want to do is to change the colour of some text between the BODY tags, your HTML editor has a quick way of doing that.
  • Highlight the text whose colour you want to change
  • From the menu bar, click on Format > Text Colour
  • The Colour dialogue box appears
  • Choose a colour by clicking on a colour square
  • Click OK

Headings

You've already met the Headings tag. If you'll remember, the Heading tag uses the letter "H" followed by a number. Like this:
<H1>My Heading</H1>
or like this:
<H4>My Heading</H4>
The heading tag increases or decreases text size above or below the default size. The default size is 3. The biggest size is 1, and the smallest 7.
The heading tag will automatically insert a line break for you, so you don't have to insert a <P> or <BR> tag after it to start a new line.
To insert a Heading tag with the HTML Editor, click on Insert > Heading then choose a Heading size. Only size 1 to 4 are used in the editor. But bear in mind, you can go as low as size 7.
When you click on a heading size, the beginning and end Tag will be inserted with the cursor flashing between the two:
<H1> </H1>
The forward slash, remember, tells the browser to stop formatting a tag. In this case, stop formatting the H1 heading tag.
With the cursor flashing between the two tags, type your text for the heading.

Centring Text

To centre text (and anything else on your page), the CENTER tag is used. Note the American spelling, with "ER" at the end and not "RE". To centre something with the HTML Editor, do the following:
  • Highlight whatever you want to centre
  • From the menu bar, click on Format > Centre
  • The two CENTER tags will surround your highlighted text
  • Save your work and view the results in your browser
Tutorial Microsoft Excel 2007 to 2010 : Excel Rows and Columns

Tutorial Microsoft Excel 2007 to 2010 : Excel Rows and Columns

Spreadsheets are displayed in a grid layout. The letters across are the top are Column headings. To highlight an entire Column, click on any of the letters. The image below shows the B Column highlighted:
Excel 2007 Column
If you look down the left side of the grid, you'll see numbers, which start at number 1 at the very top and go down to over a million. (The exact number of rows and columns are 1,048,576 rows and 16,384 columns. You've never going to need this many!) You can click a number to highlight an entire Row. If you look at the image below, you'll see that Row 5 has been highlighted.
Excel 2007 Rows
Spreadsheets are all about individual Cells. A Cell is a letter combined with a number. So if you combine the B column with Row 5, you get Cell B5. Combine Column D with Row 5 and you get Cell D5.

To see this for yourself, click inside any of the cells on your spreadsheet. In the Images below, we have clicked inside cell A1 and cell C3.

   
The first picture is Column A, Row 1 (A1), and the second picture is Column C Row 3 (C3). Notice that the cells we clicked on have a black border around them. This tells you the cell is active. The cell that is active will have its Column letter and Row number displayed in the top left, just above the letters A and B in the pictures. When you click into a cell, you can then type text and numbers.
To move around the spreadsheet, and make other cells active, you can either just click inside a Cell, or press the arrow keys on your keyboard. Try it now. Click inside a Cell and notice the Cell reference appear above the letters A and B. Press your arrow keys and notice how the active cells moves.
Before going any further, make sure you understand how the spreadsheet grid works. If you are asked to locate Cell H2, you should be able to do so.

Tutorial Microsoft Excel 2007 to 2010 : A first look at Excel

Tutorial Microsoft Excel 2007 to 2010 : A first look at Excel

If you've ever used a previous version of Excel then you'll notice that the new version looks quite different! Even if you have never used Excel, the software looks quite intimidating. But we'll make a gentle start, so that you can get used to the way everything works.
The first thing to notice is the Ribbon running right across the top. The Ribbon is supposed to be more intuitive than drop-down menus. Emphasis is placed on the tools and options appropriate to what you're doing. Here's a closer look at the Ribbon when Excel first starts (it's split in half, here):

Ribbon Left Half
Left Side of the Ribbon in Excel 2007

Ribbon Right Half
Right Side of the Ribbon in Excel 2007


Left Side of the Ribbon in Excel 2010


Right Side of the Ribbon in Excel 2010

Notice that in both versions the Home tab is the one that is selected. Other tabs are: Insert, Page Layout, Formulas, Data, Review and View. (In the image above, there's also a Developer tab. If you don't do any programming then you don't have to worry about this tab.)
In the top left of the Ribbon in Excel 2007 there's a big circle. This one:

Excel 2007 File Operations Button
Click this, and you'll see all the file operations: New, Open, Save, Exit, etc.
File Operations in Excel 2007
To see the same menu in Excel 2010, you have to click on the File tab, which is on the far left. (It looks as though it's already selected, but it's not.):
We'll go through all these menu options later, along with the various options on the Ribbon tabs. But the best place to start with Excel is getting to grips with all those numbers and letters. These are the Grid Coordinates. We'll do that in the next part.

How To Change Background Blog With Pictures


How To Change Background Blog With Pictures

blog beautiful fruit and nice views would be very helpful in increasing our blog traffic, because I myself was more interested in visiting a blog that bright colors and nice views, rather than a blog that dark color and shape is not known aliases random sacking. Although his post interesting but painful for the eyes, the better I pelototi my blog for hours - hours.

I'll share a few tips that I know about changing the background color of your blog or replace the background with images already uploaded to my friend online storage place, for example in Google Sites or Photobucket.

Here are the steps - steps:

     * Log in to Blogger.
     * Click the Layout -> Edit HTML.
     * Then find the code like this:

       body {background: # FFFFFF;
       margin: 0; color: # 000000;
       font: 12px trebuchet ms;
       text-align: center}


       Or, if confused, please click Ctrl + F then type the body {, usually located above.
     * To replace the background with another color code # FFFFFF only replace with other code, to color code can be found here. Example I replace the background with gray - gray, the result will be as follows:

       body {background: # D8D8D8;
       margin: 0; color: # 000000;
       font: 12px trebuchet ms;
       text-align: justify}
     * To change the background image or picture, such as pictures that I have saved on blogger, its url code like this:

     
     * So the result becomes as follows:

       body {background: # FFFFFF repeat-x;
       margin: 0; color: # 000000; font: 12px trebuchet ms;
       text-align: justify}
     * If completed then Save Template pal.


source
Cutting Images with Corel Draw

Cutting Images with Corel Draw

Cutting Images with Corel Draw

In the previous Photoshop tutorial on ilmugrafis we've been practicing how to cut or separate the objects with the background ala Photoshop so now we will discuss other alternatives for those who may only have coreldraw application without having Photoshop on his computer as well as for those who want practical so no need to export import images in photoshop to coreldraw. So we call it a tutorial cut images in Corel

For those engaged in the service setting of this tutorial may be trivial, but for those who are beginners and it is good self-taught master of this technique
Here's how / tutorial:

1. Open Applications Coreldraw, enter the picture we will edit
Click Menu>> Import
here I use a toy duck image
(so remember kindergarten song, cut the duck goose, geese dikuali, the lady asked ... wow digress)

proprietary by ilmugrafis.com

2. click the pen on the toolbar
proprietary by ilmugrafis.com

3. Create an area up to the Pen, stay left click and left click on the image, if an error occurred press ctrl + z
proprietary by ilmugrafis.com
with this exercise will train you to use the pen tool for tracing, so the above exercise is very much beneficial
It takes patience and perseverance to get maximum results

proprietary by ilmugrafis.com
tips:
hold left click to regulate the flow curve of the pen
press CTRL + Z to Undo

4. Having drawn a full line / up to the starting point, press the Spacebar on the keyboard to select the Pick Tool


proprietary by ilmugrafis.com
press left click right / right inside the black line you created (1) and then hold down the Shift key on your keyboard and click on the image area outside the duck (1)

5. Then select Intersec

proprietary by ilmugrafis.com
delete the lines you created by clicking the line and click Delete on the keyboard
if you do fit / right then you will get a duck without a background image like this

proprietary by ilmugrafis.com
Duck without a background image (the selected object / Cut)
thanks
may be useful